


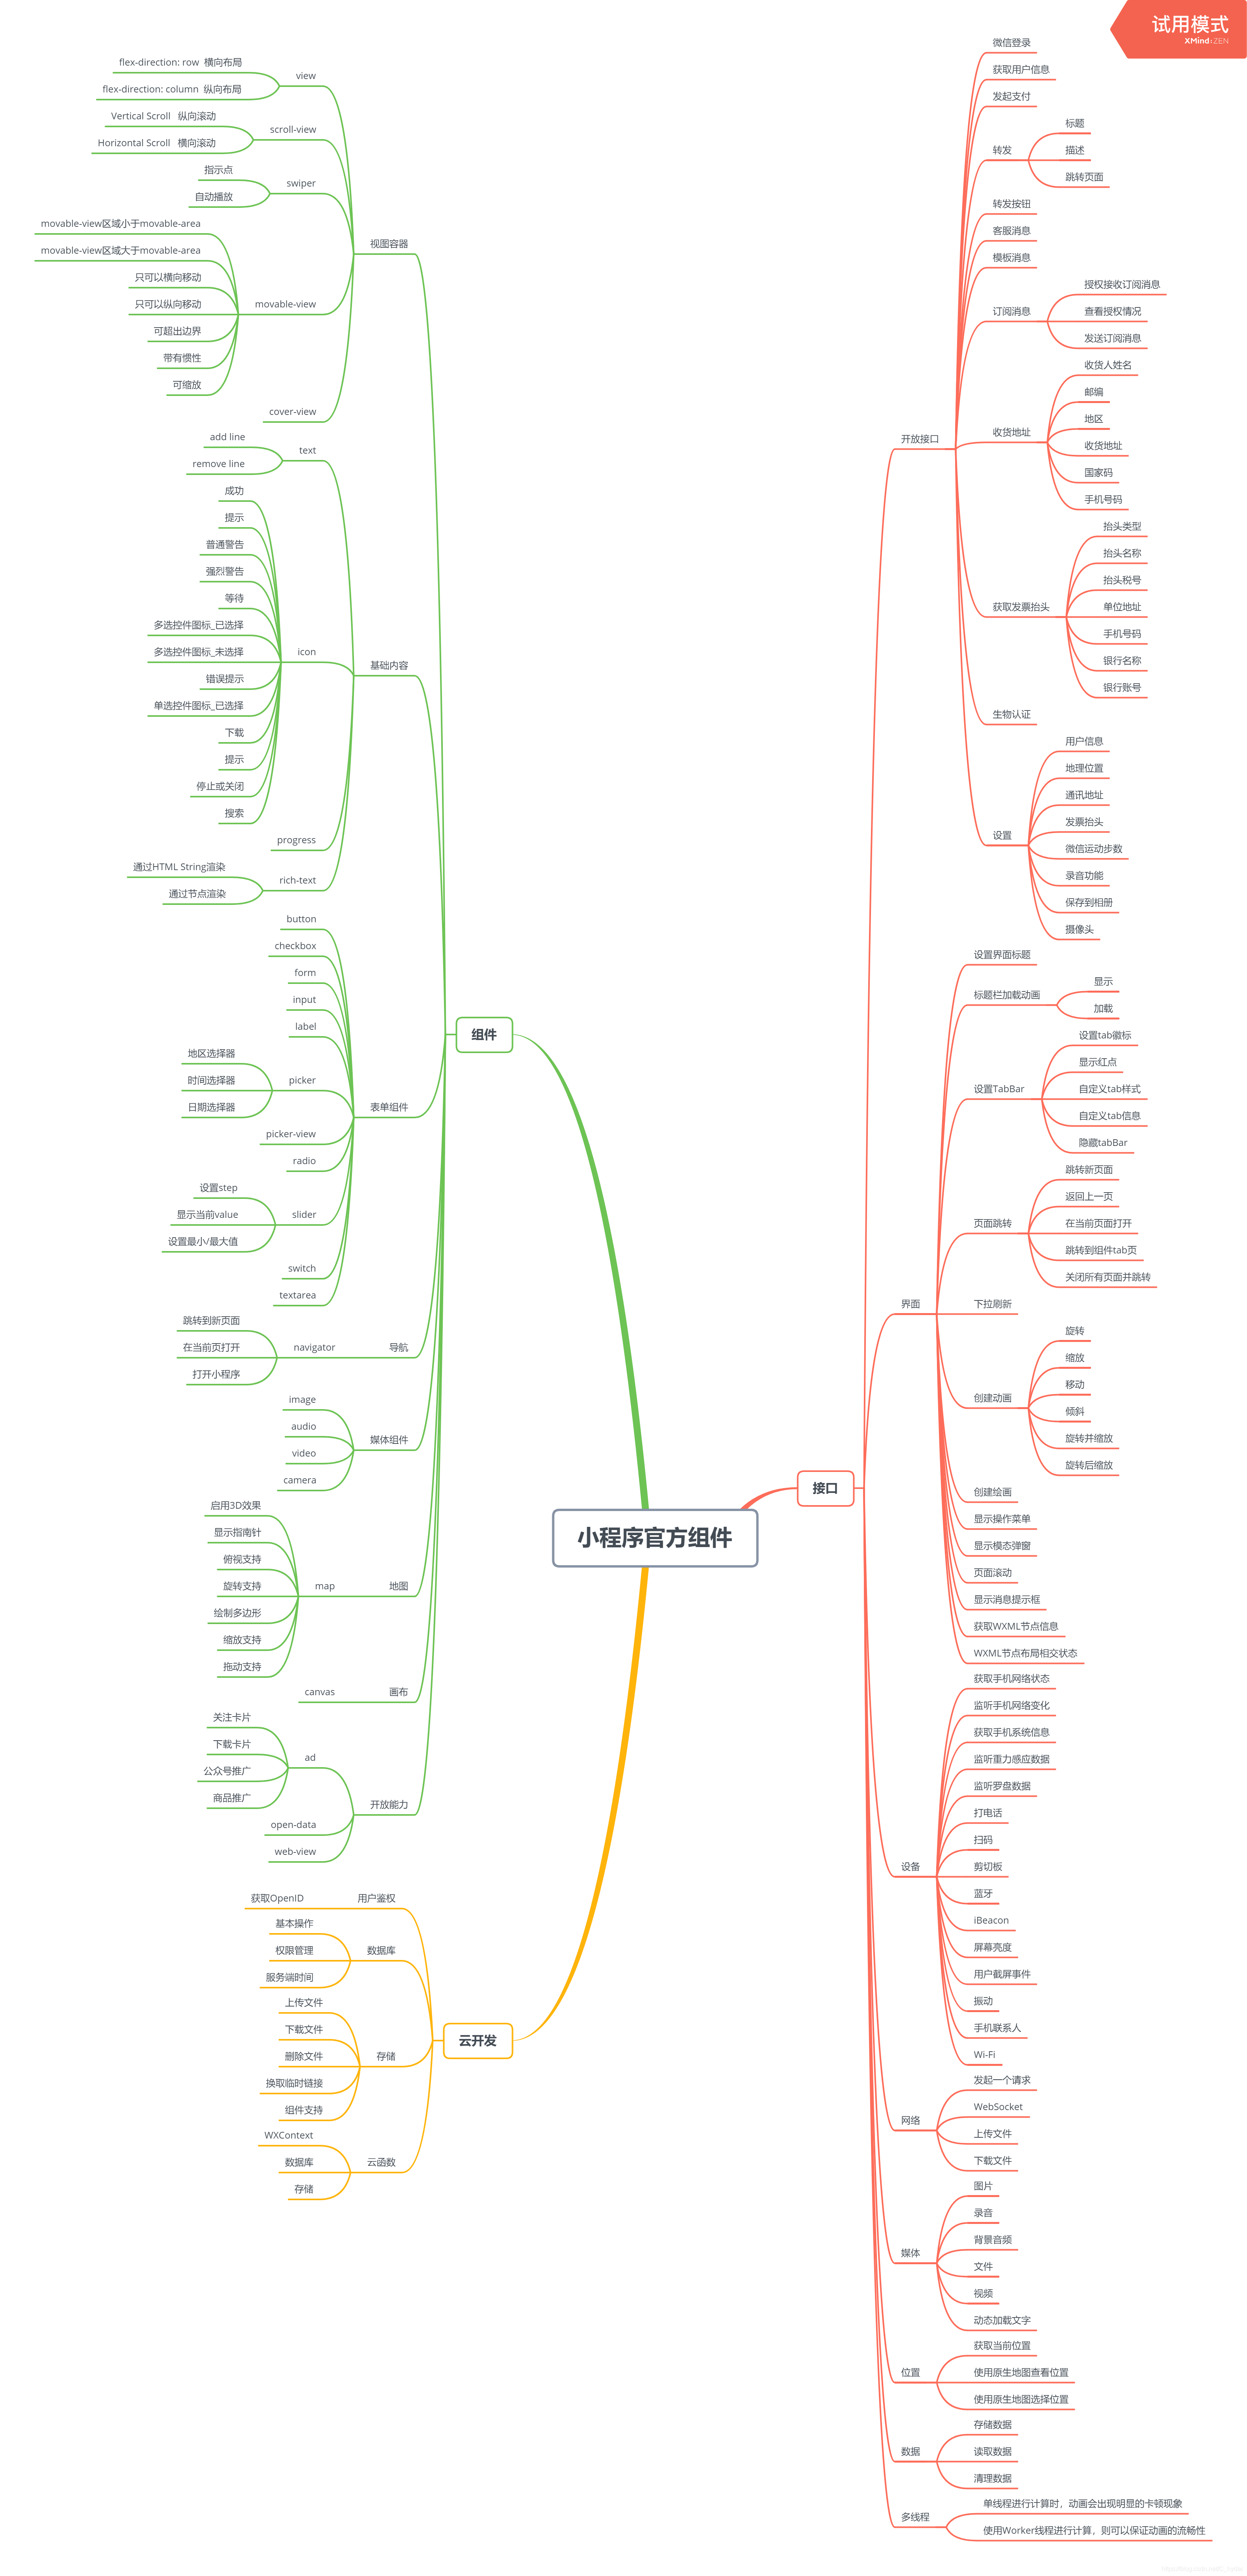
组件
原生组件说明
小程序中的部分组件是由客户端创建的原生组件,这些组件有:
cameracanvasinput(仅在focus 时表现为原生组件)live-playerlive-pushermaptextareavideo
原生组件的使用限制
由于原生组件脱离在 WebView 渲染流程外,因此在使用时有以下限制:
- 原生组件的层级是最高的,所以页面中的其他组件无论设置
z-index为多少,都无法盖在原生组件上。- 后插入的原生组件可以覆盖之前的原生组件
- 原生组件还无法在
<picker-view>中使用- 基础库 2.4.4 以下版本,原生组件不支持在
<scroll-view>、<swiper>、<movable-view>中使用。
- 基础库 2.4.4 以下版本,原生组件不支持在
- 部分CSS样式无法应用于原生组件,例如:
- 无法对原生组件设置 CSS动画
- 无法定义原生组件为
position: fixed - 不能在父级节点使用
overflow: hidden来裁剪原生组件的显示区域
- 原生组件的事件监听不能使用
bind: eventname的写法,只支持bindeventname。原生组件也不支持 catch 和 capture 的事件绑定方式。 - 原生组件会遮挡 vConsole 弹出的调试面板。
在工具上,原生组件是用 web 组件模拟的,因此很多情况并不能很好的还原真机的表现,建议开发者在使用到原生组件时尽量在真机上进行调试。
cover-view 与 cover-image
为了解决原生组件层级最高的限制,小程序专门提供了cover-view和cover-image组件,可以覆盖在部分原生组件上面。这两个组件也是原生组件,但是使用限制与其他原生组件有所不同。
视图容器
基础内容
表单组件
导航
媒体组件
audio 音频
注意:1.6.0 版本开始,该组件不再维护。建议使用能力更强的wx.createInnerAudioContext 接口,相关api:wx.createAudioContext。
<!-- audio.wxml --><audio poster='{{poster}}' name='{{name}}' author='{{author}}' src='{{src}}' id='myAudio' controls loop></audio><button type='primary' bindtap='audioPlay'>播放</button><button type='primary' bindtap='audioPause'>暂停</button><button type='primary' bindtap='audio14'>设置当前播放事件为14s</button><button type='primary' bindtap='audioStart'>回到开头</button>Page({ onReady(e) { // 使用 wx.createAudioContext 获取 audio 上下文 context this.audioCtx = wx.createAudioContext('myAudio') }, data: { poster: 'http://y.gtimg.cn/music/photo_new/T002R300x300M000003rsKF44GyaSk.jpg?max_age=2592000', name: '此时此刻', author: '许巍', src: 'http://ws.stream.qqmusic.qq.com/M500001VfvsJ21xFqb.mp3?guid=ffffffff82def4af4b12b3cd9337d5e7&uin=346897220&vkey=6292F51E1E384E06DCBDC9AB7C49FD713D632D313AC4858BACB8DDD29067D3C601481D36E62053BF8DFEAF74C0A5CCFADD6471160CAF3E6A&fromtag=46' }, audioPlay() { this.audioCtx.play() }, audioPause() { this.audioCtx.pause() }, audio14() { this.audioCtx.seek(14) }, audioStart() { this.audioCtx.seek(0) }})
image 图片
- image 组件默认宽度300px、高度225px
- image 组件中二维码 / 小程序码图片不支持长按识别。
- 仅在
wx.previewImage中支持长按识别
<!-- image --><view class='page'> <view class='page_hd'> <text class='page_title'>image</text> <text class='page_desc'>图片</text> </view> </view><view class='page_bd'> <view class='section section_gap' wx:for="{{array}}" wx:for-item="item"> <view class='section_title'>{{item.text}}</view> <view class='section_ctn'> <image style='width: 200px; height: 200px; background-color: #eeeeee;' mode='{{item.mode}}' src='{{src}}' ></image> </view> </view></view>Page({ data: { array: [{ mode: 'scaleToFill', text: 'scaleToFill:不保持纵横比缩放图片,使图片完全适应' }, { mode: 'aspectFit', text: 'aspectFit:保持纵横比缩放图片,使图片的长边能完全显示出来' }, { mode: 'aspectFill', text: 'aspectFill:保持纵横比缩放图片,只保证图片的短边能完全显示出来' }, { mode: 'top', text: 'top:不缩放图片,只显示图片的顶部区域' }, { mode: 'bottom', text: 'bottom:不缩放图片,只显示图片的底部区域' }, { mode: 'center', text: 'center:不缩放图片,只显示图片的中间区域' }, { mode: 'left', text: 'left:不缩放图片,只显示图片的左边区域' }, { mode: 'right', text: 'right:不缩放图片,只显示图片的右边边区域' }, { mode: 'top left', text: 'top left:不缩放图片,只显示图片的左上边区域' }, { mode: 'top right', text: 'top right:不缩放图片,只显示图片的右上边区域' }, { mode: 'bottom left', text: 'bottom left:不缩放图片,只显示图片的左下边区域' }, { mode: 'bottom right', text: 'bottom right:不缩放图片,只显示图片的右下边区域' }], src: 'https://developers.weixin.qq.com/miniprogram/dev/image/cat/0.jpg?t=19022220' }, imageError(e) { console.log('image3发生error事件,携带值为', e.detail.errMsg) }})
video 视频
该组件是原生组件。<video>默认宽度300px,高度225px,可通过wxss设置宽高。
相关api:wx.createVideoContext
<view class="section tc"> <video src="{{src}}" controls></video> <view class="btn-area"> <button bindtap="bindButtonTap">获取视频</button> </view></view><view class="section tc"> <video id="myVideo" src="http://wxsnsdy.tc.qq.com/105/20210/snsdyvideodownload?filekey=30280201010421301f0201690402534804102ca905ce620b1241b726bc41dcff44e00204012882540400&bizid=1023&hy=SH&fileparam=302c020101042530230204136ffd93020457e3c4ff02024ef202031e8d7f02030f42400204045a320a0201000400" danmu-list="{{danmuList}}" enable-danmu danmu-btn controls ></video> <view class="btn-area"> <button bindtap="bindButtonTap">获取视频</button> <input bindblur="bindInputBlur" /> <button bindtap="bindSendDanmu">发送弹幕</button> </view></view>function getRandomColor() { const rgb = [] for (let i = 0; i < 3; ++i) { let color = Math.floor(Math.random() * 256).toString(16) color = color.length == 1 ? '0' + color : color rgb.push(color) } return '#' + rgb.join('')}Page({ onReady(res) { this.videoContext = wx.createVideoContext(
版权声明
即速应用倡导尊重与保护知识产权。如发现本站文章存在版权问题,烦请提供版权疑问、身份证明、版权证明、联系方式等发邮件至197452366@qq.com ,我们将及时处理。本站文章仅作分享交流用途,作者观点不等同于即速应用观点。用户与作者的任何交易与本站无关,请知悉。


