效果图
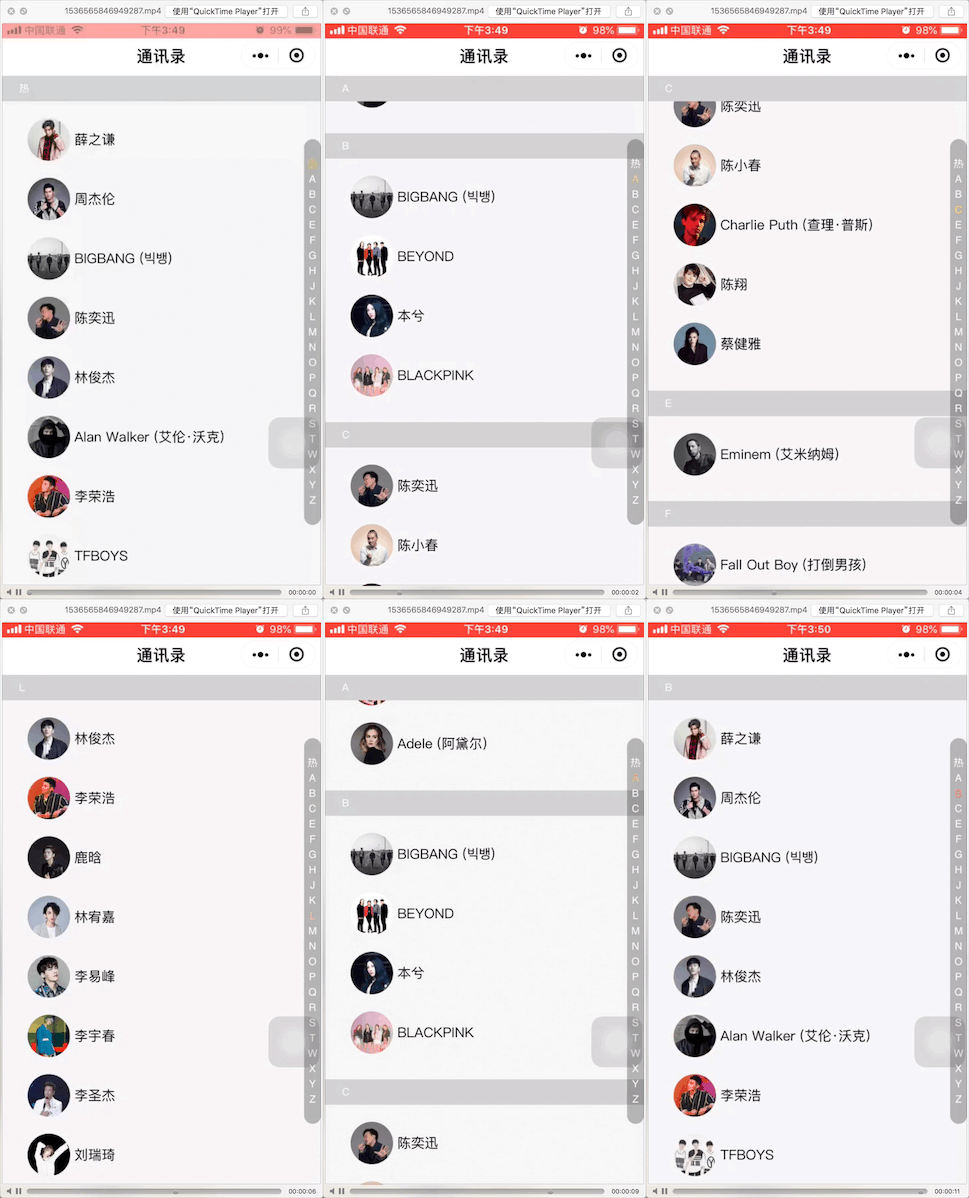
因为是使用的手机录屏,视频格式为MP4,上传到文章时发现只支持图片,还好电脑自动录屏功能,所以简单的录制了一下,完后又提示只能4M,只能再去压缩图片,所以画质略渣,各位客官讲究的看看吧。
特色功能介绍
- 用户只需按照格式传入参数,组件能够自动将参数按首字母分组,简单方便;
- 组件右侧首字母导航无需另外传值,并且根据参数具体有哪些首字母显示(没有的咱就不要);
- 用户进行上下滑动时,左右相互联动;
- 点击右侧导航,组件会相应的上下滚动。
实现基础
说到滚动当然少不了小程序的基础组件scroll-view,该组件就是在此基础上实现的;
监听组件scroll-view的bindscroll事件,进而对组件数据进行操作,即可完成。
Wxml
- 滚动区域
scroll-view scroll-y style="height:100%;white-space:nowrap;" scroll-into-view="{{toView}}" enable-back-to-top bindscroll="scroll" scroll-with-animation scroll-top="{{scrollTop}}" view class="list-group" wx:for="{{logs}}" wx:for-item="group" view class="title" id="{{group.title}}"{{group.title}}/view block wx:for="{{group.items}}" wx:for-item="user" view id="" class="list-group-item" image class="icon" src="{{user.avatar}}" lazy-load="true"/image text class="log-item"{{user.name}}/text /view /block /view/scroll-view简单说一下上述代码:根据小程序文档,在使用scroll-view组件用于竖向滚动时一定要设置高度,你们可以看到我在代码中设置了’height:100%;'这就实现了组件的滚动高度是整个页面。
但是请注意:很多同学会发现设置了高度100%后,组件并没有效果,这是因为你没有将页面高度设置为100%,所以你还需在app.wxss中设置page的高度为100%
其他的属性看文档就好,我就不再多说;
2.侧边字母导航
view class="list-shortcut" block wx:for="{{logs}}" text class="{{currentIndex===index?'current':''}}" data-id="{{item.title}}" bindtap='scrollToview'{{item.title}}/text /block/view3.固定在顶部的字母导航
仔细的同学能发现在滚动时,顶部有一个固定位置的字母导航,其值对应滚动到的区域
view class="list-fixed {{fixedTitle=='' ? 'hide':''}}" style="transform:translate3d(0,{{fixedTop}}px,0);" view class="fixed-title" {{fixedTitle}} /view/viewWxss
样式太简单了,就不发了,重点看js部分

js
- 拿到参数第一步当然是将参数列表渲染上去啦,
normalizeSinger(list) { //歌手列表渲染 let map = { hot: { title: this.data.HOT_NAME, items: [] } } list.forEach((item, index) = { if (index this.data.HOT_SINGER_LEN) { map.hot.items.push({ name: item.Fsinger_name, avatar:this.constructor(item.Fsinger_mid) }) } const key = item.Findex if (!map[key]) { map[key] = { title: key, items: [] } } map[key].items.push({ name: item.Fsinger_name, avatar: this.constructor(item.Fsinger_mid) }) }) let ret = [] let hot = [] for (let key in map) { let val = map[key] if (val.title.match(/[a-zA-Z]/)) { ret.push(val) } else if (val.title === this.data.HOT_NAME) { hot.push(val) } } ret.sort((a, b) = { return a.title.charCodeAt(0) - b.title.charCodeAt(0) }) return hot.concat(ret) },将用户数据分为两大块,即热门组和不热门组(开个玩笑?),默认将参数的前10组归类为热门组,然后对所以参数安装首字母进行排序分组。
2. 计算各组高度
var lHeight = [], that = this;let height = 0;lHeight.push(height);var query = wx.createSelectorQuery();query.selectAll('.list-group').boundingClientRect(function(rects){ var rect = rects, len = rect.length; for (let i = 0; i len; i++) { height += rect[i].height; lHeight.push(height) } }).exec();var calHeight = setInterval(function(){ if (lHeight != [0]) { that.setData({ listHeight: lHeight }); clearInterval(calHeight); } },1000)在获取元素属性上,小程序提供了一个很方便的api,wx.createSelectotQuery();具体使用方法请看节点信息API
使用该方法获取到各分组的高度,存入lHeight中用于之后滚动时判断使用;
同学们可以看到我在将lHeight赋值给data的listHeight时使用了定时器,这是因为获取节点信息api是异步执行的,顾你直接进行赋值是没有效果的,所以我使用了定时器功能;
我觉得这里使用定时器不是最好的处理方式,同学们有更好的方法请告诉我,谢谢
3.第三步就是在滚动的时候获取滚动高度,相应的处理即可,滚动使用到了scroll-view自带事件,这个事件会返回滚动的距离,及其方便
const listHeight = this.data.listHeight// 当滚动到顶部,scrollY0if (scrollY == 0 || scrollY 0) { this.setData({ currentIndex:0, fixedTitle:'' }) return}// 在中间部分滚动for (let i = 0; i listHeight.length - 1; i++) { let height1 = listHeight[i] let height2 = listHeight[i + 1] if (scrollY = height1 && scrollY height2) { this.setData({ currentIndex:i, fixedTitle:this.data.logs[i].title }) this.fixedTt(height2 - newY); return }}// 当滚动到底部,且-scrollY大于最后一个元素的上限this.setData({ currentIndex: listHeight.length - 2, fixedTitle: this.data.logs[listHeight.length - 2].title})参数格式
list:[ { "index": "X", "name": "薛之谦", }, { "index": "Z", "name": "周杰伦", }, { "index": "B", "name": "BIGBANG (빅뱅)", }, { "index": "B", "name": "陈奕迅", }, { "index": "L", "name": "林俊杰", }, { "index": "A", "name": "Alan Walker (艾伦·沃克)", },]如果你们还需要其他的参数,对应的在后面加上即可。
END
如果想看完整代码,请戳GITHUB欢迎star
欢迎关注我的个人博客
如果有疑问,欢迎提问