1.首先前往开发者工具下载安装开发工具:
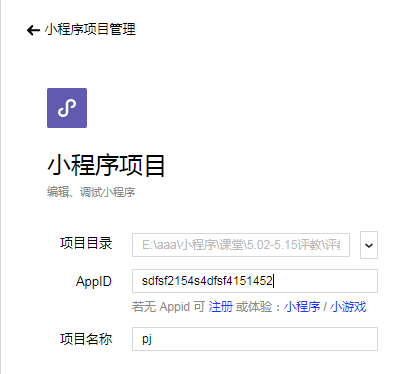
2.安装后微信扫码,并填写自己的AppID选择自己的项目目录后登录:
登陆后点击工具上的编译按钮,可以在工具的左侧模拟器界面看到这个小程序的表现,也可以点击预览按钮,通过微信的扫一扫在手机上体验你的第一个小程序。
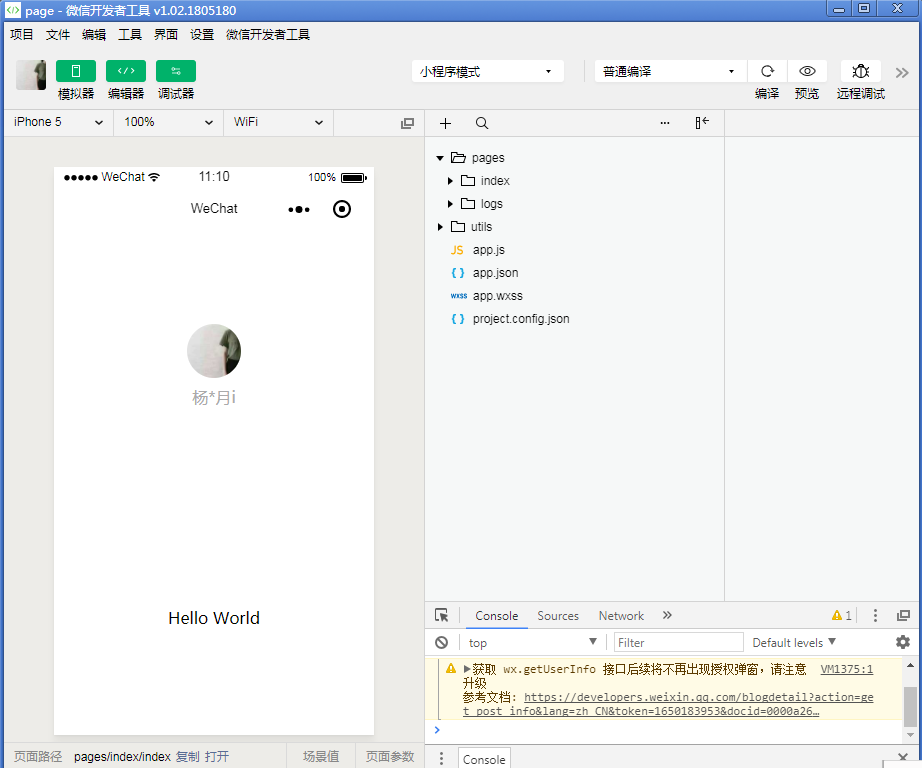
3.代码构成:可以看到在项目的根目录有一个 app.json 和 project.config.json,在app.json中是对当前小程序的全局配置,包括了小程序的所有页面路径、界面表现、网络超时时间、底部 tab 等,内容如下:
{ "pages":[ "pages/index/index", "pages/logs/logs" ], "window":{ "backgroundTextStyle":"light", "navigationBarBackgroundColor": "#fff", "navigationBarTitleText": "WeChat", "navigationBarTextStyle":"black" }}project.config.json的作用:你在工具上做的任何配置都会写入到这个文件,当你重新安装工具或者换电脑工作时,你只要载入同一个项目的代码包,开发者工具就自动会帮你恢复到当时你开发项目时的个性化配置,其中会包括编辑器的颜色、代码上传时自动压缩等等一系列选项。内容如下:
{"description": "项目配置文件。","packOptions": {"ignore": []},"setting": {"urlCheck": true,"es6": true,"postcss": true,"minified": true,"newFeature": true},"compileType": "miniprogram","libVersion": "2.0.4","appid": "wx9cff9d70e4813ce5","projectname": "page","isGameTourist": false,"condition": {"search": {"current": -1,"list": []},"conversation": {"current": -1,"list": []},"game": {"currentL": -1,"list": []},"miniprogram": {"current": -1,"list": []}}}4.app.js(交互逻辑)响应用户的点击、获取用户的位置等等。在小程序里边,我们就通过编写 JS 脚本文件来处理用户的操作。本js中写的是获取微信的头像,显示信息(hello word!)以及点击它们时所触发的事件,代码如下:
//app.jsApp({ onLaunch: function () { // 展示本地存储能力 var logs = wx.getStorageSync('logs') || [] logs.unshift(Date.now()) wx.setStorageSync('logs', logs) // 登录 wx.login({ success: res = { // 发送 res.code 到后台换取 openId, sessionKey, unionId } }) // 获取用户信息 wx.getSetting({ success: res = { if (res.authSetting['scope.userInfo']) { // 已经授权,可以直接调用 getUserInfo 获取头像昵称,不会弹框 wx.getUserInfo({ success: res = { // 可以将 res 发送给后台解码出 unionId this.globalData.userInfo = res.userInfo // 由于 getUserInfo 是网络请求,可能会在 Page.onLoad 之后才返回 // 所以此处加入 callback 以防止这种情况 if (this.userInfoReadyCallback) { this.userInfoReadyCallback(res) } } }) } } }) }, globalData: { userInfo: null }})下面在page中再建一个login目录用来写登录页面,login.xml中写页面的模板,相当于html:
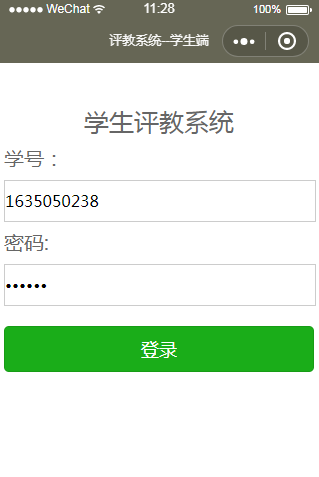
!--pages/login/login.wxml--view class='container' view class='header' text学生评教系统/text /view form bindsubmit="formSubmit" view class='section' text学号:/text input type='number' placeholder='请输入学号' name="no" value='1635050238'/ /view view class='section' text密码:/text input password='true' placeholder='请输入密码' name="pwd" value='123456'/ /view view class='button' button type='primary' form-type='submit'登录/button /view /form view class='fpwd' bindtap='findpwd' text忘记密码/text /view/view在login.wxss中写模板的样式,相当于css:
/* pages/login/login.wxss */form{ width: 310px; height: 240px; line-height: 40px; /* border: 1px solid red; */}input{ border: 1px solid #ccc; width: 310px; height: 40px;}.button{ margin-top: 20px;}.header text{ font-size: 25px; color: #666;}form text{ font-size: 20px; color: #666;}.fpwd{ margin-top: 200px;}.fpwd text{ color: #ccc; font-size: 18px;}login.js中写当点击登陆时所触发的事件:
// pages/login/login.jsPage({ /** * 页面的初始数据 */ data: { }, formSubmit: function (e) { // console.log(e.detail.value); wx.request({ // url: 'https://www.lishuming.top/pj/index.php/student/api/login', //仅为示例,并非真实的接口地址 url: app.globalData.url.login, data: { username: e.detail.value.no, password: e.detail.value.pwd }, header: { 'content-type': 'application/json' // 默认值 }, success: function (res) { console.log(res.data); if (res.statusCode == 200) { //访问正常 if (res.data.error == true) { wx.showToast({ title: res.data.msg, icon: 'none', duration: 2000, }) } else { //缓存 wx.setStorage({ key: "student", data: res.data.student }); wx.showToast({ title: "登陆成功", icon: 'success', duration: 20000, success: function () { setTimeout(function () { wx.switchTab({ url: '../teachers/teachers', }) }, 2000) } }) } } } }) }})页面显示: